Pages

Friday 27 January 2017

Sweet Dixie Fan.. a card for all occasions..

Sharing a quick decorative card today using a die released in 2015 the Sweet Dixie Fan die SDD057 designed by Sue Dix from Personal Impressions.


The Fan has been cut from Xmas Red Centura Pearl card and backed onto Centura Pearl Old Gold leaving the scalloped edge open. Black gem stones in varying sizes have been used to embellish.


Golden Rod, Xmas Red and Black Diamond Ranger Stickles glitter glue has been used to add to the fans detail.


A best wishes sentiment embossed using Sweet Dixie Mirror Gold embossing powder has been added to matt and layered co-ordinating card along with the decorated Fan and a handmade tassel. 


Thank you for sharing your time, wishing you a wonderful weekend.

Creative Hugs from Tracey xxx

Tuesday 24 January 2017

Frosty Robin

Regrettably I never got chance to use this delightful stamp before Christmas, whilst having a top and tail of some of my stamp collection I thought I would test stamp the Robin from IndigoBlu and just couldn't resist creating a little hanging plaque.


I painted a 6x6" greyboard with white gesso then Grandma's Teacup acrylic by IndigoBlu, whilst the paint was still wet I removed some of the paint using a sponge exposing the white gesso.


Using versafine black onyx I stamped the Bare Forest Stamp various times using a mask to 
help resist some of the ink transferring onto the board.


Using an oral syringe filled with IndigoBlu Super Thick Slap I followed the stamped branches by pushing the slap it on through the syringe giving a thin raised appearance.


Sprinkling with unicorn sparkles this really gives the look of frosty branches.


The robin has been stamped, embossed and painted with Postbox Red & Hot Cocca, posca pens have been used to add finer detail with the finished image being fussy cut. I decided to cut the fruit off my design as it did not go with what I was hoping to achieve.


Onto the board The Robin along with red gems have been randomly adhered to represent berries, adding a spot of white gesso to each berry blends them nicely into the picture.


I edged the board using clear embossing pen and white embossing powder.
The word freedom is from IndigoBlu's Plume stamp set stamped and embossed onto paper also  painted in the Grandma's Teacup. 


As I stated earlier this really is a delightful stamp and i'm already thinking of ways to use it..

I'd like to enter this in the Rubber Dance Stamp Challenge - January Blue-Red-White

Thank you for sharing your time to take a peek.. 
Creative Hugs from Tracey xxx

Sunday 15 January 2017

Snow, Snow, Snow.. January Tag

As promised using the same mini instructions given in a Twelve week tag challenge from last year here is my first Tag of the year. I've used the Theme of Snow which was quite apt as it did actually snow during the making of this tag and as it is using
so many lovely IndigoBlu elements i'm going to enter it in Decembers 
IndigoBlu Blog Challenge Snow, Snow, Snow.


First I painted a 6" Tando Creative  tag with white gesso, then with Indigoblu Frosty Sky acrylic paint, when dry I rollered over with white acrylic paint.
The roller has left plenty of extra marks


Sweet Poppy Pearlescent White Paste was stencilled through a Clarity tree stencil


 one collage piece added from Crafty Individuals Christmas miniatures book


a layer of  (VERY watered down) DecoArt Americana midnight blue paint
to make it translucent. This has really brought out the shape of the tree and added shadow.


Sprayed on Yellow paint left over from previous tag made.


White gesso stencilled through IndigoBlu mini stencil, clear gesso applied when dry.


I stamped Indigoblu Snowflakes stamp with versafine onyx black ink & embossed with stampendous white shabby chic frantage  to expand the fine detail of the stamp.


Focal collage added using an Indigoblu Large Snowflake image which I had previously stamped onto vellum with flitter glue and gilded with sheffied steel gilding flakes.
This was glued  onto the side of the tag with the waste being used on the bottom.

                   
enhanced the large snowflake stamp with doodles & flat back pearls
                                             

Could not decide which word to use so I chose this sentence, from
IndigoBlu Grand Tour 3 A5 stamp set

   
 ... and my Tag is complete    


Thank you for sharing your precious time to take a peek, 
wishing you all a fantastic weekend.
Creative Hugs from Tracey xxx

Friday 13 January 2017

Get Well Soon Sweet Dixie

A little Get Well Card to Friends and Family suffering with winter coughs and colds.


The background is created using Sweet Dixie Spring Blooms Stencil 
Designed by Kath Halstead. 
The Floral Watering Can Die by Sue Dix has been cut from black card and silver gilding wax used to highlight the dies detail and give that metal look. 


The upper flower part of the die was cut using  many colours and layered 
to create a colourful bouquet.
Ranger Stickles glue and gemstones have been added for sparkle.

For those of you suffering I wish you a speedy recovery and hope you get chance to put your feet up and have a restful weekend.

Creative Hugs from Tracey xxx


Thursday 12 January 2017

Twelve week Tag Challenge

A little Social Media Group I am a member of sets challenges and tasks of the *Mini* kind and I've had the great pleasure of sharing in some of their challenges from decorating lollypop sticks to 3" Fabric swatches, At times we swap and sometimes we share but there are times when we just soak up everyone's creative makes if we find life is just a little bit too busy to join in.

In September 2016 a challenge was set to create a Tag from a series of mini instructions. We did not know how long the challenge would last all we were told was once a week we would be give a short instruction and not to spend more than 10 minutes on each.
Each instruction was a guideline and however you interpreted them could be modified depending on readily available resources.

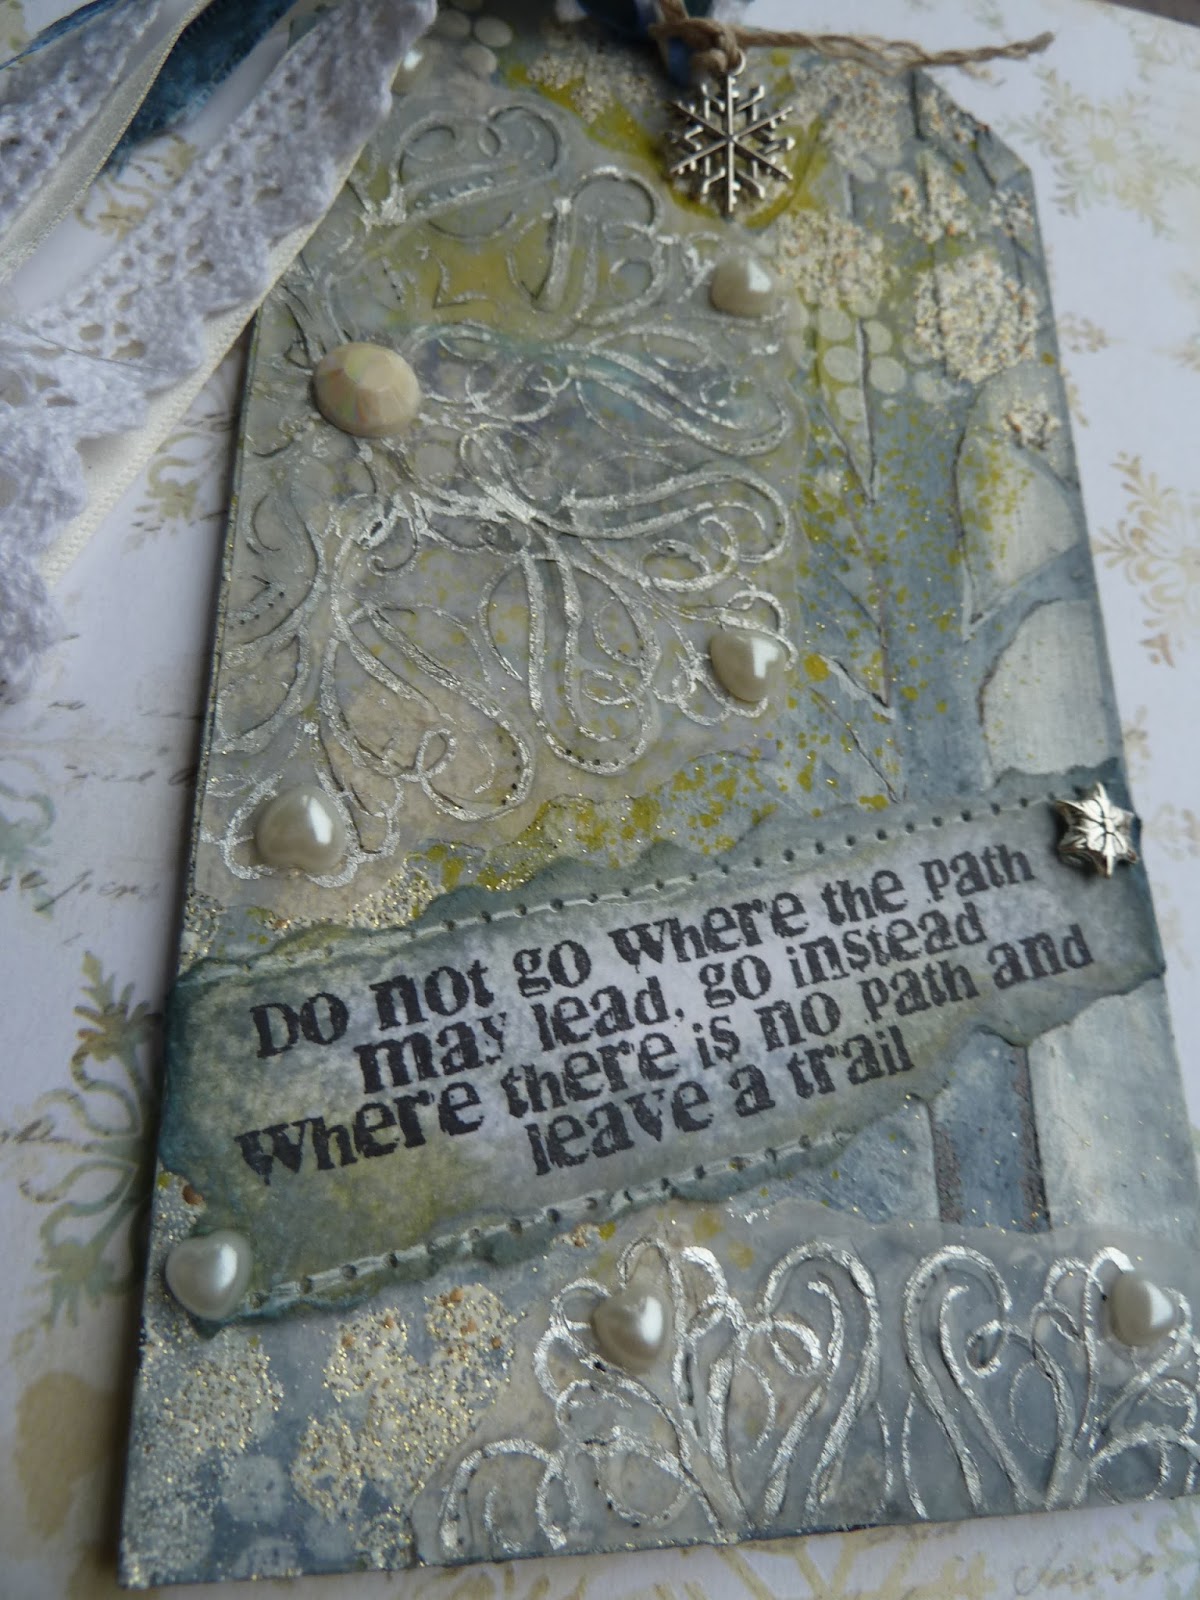
This is what I created during those 12 weeks.. 


I hope you can follow me on my fast track 12 week journey in words and pictures.


Week 1:
Find or create a tag; any colour, texture or size. 
Add one layer of gesso.
when dry add one colour.

*Tando Creative 6" Greyboard Tag painted with white gesso, when the gesso was dry 
DecoArt Dark Grey was applied using a roller*


Week 2:
Add a further paint colour to your tag and while it is still wet, draw or write into it 
with the end of a paintbrush or pencil'.

* DecoArt Quinacridone Gold was again applied using a roller and the words RUSTY 
scribbed into the wet paint*


Week 3:
Press modelling/gel/grunge paste through any stencil of your choice.

*Pressing IndigoBlu Super Thick Slap it on through Andy Skinners Time Warp Stencil*


*This is what it looked like when it had dried*


Week 4:
Add some collage with matte/gloss medium, collage Page or your preferred glue. 
Add a layer of matte medium over the top of the collage piece/pieces.

*I Randomly adhered torn Kaisercraft papers using DecoArt Matte Medium*


Week 5:
Add a layer of translucent paint.

* I just watered down some Yellow acrylic paint*

Week 6:
Spray or drip a contrasting colour of paint or ink across/down your tag.

*I Sprayed Dylusions White Linen Spray*

Week 7:
Add more stencilled layers

*Black Gesso was dabbed through a cogs stencil*.

* Instructions 5, 6 & 7 were completed together hence spray leaking through the gesso*


Week 8:
Use clear gesso to completely cover your tag.

*As you can see the clear gesso has dragged most of the Dylusions spray off the tag*


Week 9:
Stamp one or more images across your tag.

*Industrial Lamps stamped with Town House Teal acrylic paint, both from Indigoblu*


Week 10:
Cut out and adhere a main focal image to your tag. This can be drawn, stamped, collages, downloaded or cut from a book/magazine.

*I used an image I had previously stamped and embossed - a Dragonfly from 
Inky Doodles Time Flies A5 stamp set*


Week 11:
Add doodles, marks and/or embellishments to your tag.

*I added a Butterfly image again from Inky Doodles Time Flies stamp set
and doodled & highlighted using Posca Marker Pens*


...and finally 
Week 12: 
Find a word in a book or magazine to attach to your image.

*Words added from yet again Inky Doodles Time Flies stamp set*


... and the Tag is complete..!

Now the whole experience of being given small instructions once a week may seem simple but I found the whole experience like having a cookie and only being aloud one bite a week. A CRAFTING DIET well... its quite unheard of, but what I did find was when the twelve weeks were over I actually missed these weekly instructions... 

So now the new year has well and truly arrived I have decided that each month I will create a new Tag using the same instructions, there maybe a theme to them as now I know each step that lies ahead but it maybe random.. and of course I don't need to wait one week for the next task as it has already been written.

Thank you to Chris Cresswell for those tasks of wisdom and Thank you to Kaisia from *WanderLust 2016* for encouraging Chris to pass on your inspiration you may have created a mini monster.

*Watch this Space*...I hope you can all share your time with me on my mini adventure..

Creative Hugs from Tracey xxx


Saturday 7 January 2017

*Happy New Year* Saying it with Flowers

Wishing you all a *Happy New Year*

A little later than expected but i'm saying it with flowers.
Using Stampendous Build a Bouquet Cling Stamps designed by Fran Seiford this set has been a regular go to stamp set of mine for over a year now.


The set consists of a bowl & Jar Vase, three flower head stamps, one leaf and a butterfly.
With each element being separate this enables you to do as its name suggests 
*Build a Bouquet*


The bowl has been stamped and embossed using clear embossing powder 
to give shine and resemble a glass vase.


The Flowers have been coloured in using Spectrum Noir Illustrator pens from the Basics, Hues and Tones sets, hand cut, shaped and randomly placed


 Adding a little bit of sparkle using paprika and yellow stickles glitter glue the Jar Vases of Flowers have been created in the same way and as you can see each one is unique with its flower arrangement.

Stampendous Build a Bouquet cling stamp set creates cards for every occasion 
and I am sure will be greatly received.

Thank you for sharing your precious time, I look forward to sharing much more with you 
on my creative Journey.

Crafty Hugs from Tracey xxx